Gladiolus - A Must-Have For Your Vintage Garden
Always stunning, the Gladiolus combines old-fashioned and nostalgic feelings with easy to grow requirements making them perfect for flower beds as well as containers. With very little effort, they will burst into bloom and add sensational summer color to the garden. They can be overwintered by digging them up in the fall, storing, and replanting the following spring.
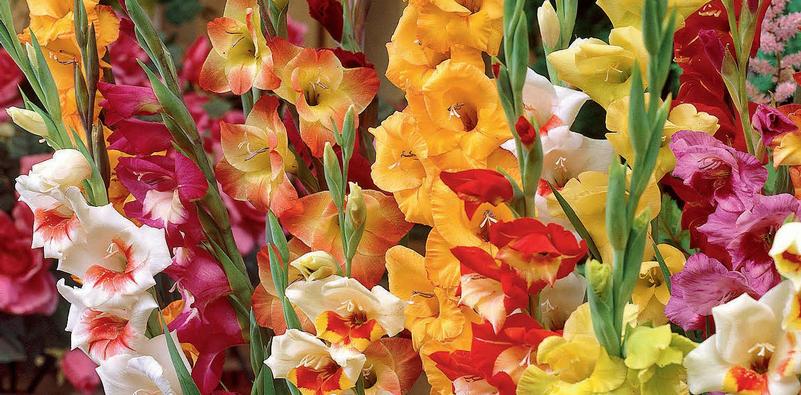
Butterfly Mix Gladiolus
Planting Gladiolus
Start planting Gladioli corms (very similar to bulbs) in the spring, once the danger of frost has passed and the soil has warmed to at least 13°C. If you’d like to have continuous blooms through early fall, plant another round of corms every 2 weeks until early summer.
Gladioli prefer to be in full sun and thrive with well-drained soil that’s moderately fertile. They will not do well in heavy, soggy soil. Prepare your garden by using a garden fork or tiller to loosen the soil to about 12 to 15 inches deep. After loosening the soil, mix in a 2- to 4-inch layer of compost or aged manure.
Place the corms in the hole about 4 inches deep with the pointed end facing up. Do not plant too shallow or the plants may topple over when in full bloom. Cover with soil and press firmly. Space the corms 6 to 8 inches apart. If your intention is for cut flowers, plant them in rows. If planted with other flowers in borders or annual beds, plant the corms in groups of 7 or more for the best effect.
Water the corms thoroughly at planting. If you’re planting tall varieties, be sure to stake them at planting time. Be careful not to damage the corms with the stakes. Some gardeners leave markers such as painted rocks so they know where to dig their gladiolus up in the fall for overwintering.
Mulch around your Gladiolus with a 2 to 4 inch layer, to keep your soil moist and help prevent weeds. If you get less than 1 inch of rain a week (summer of 2021) , water your plants regularly throughout the summer. Otherwise, water them moderately when in growth to keep the soil moist. Deadhead the spent flowers to ensure continuous blooms. Once all the flowers on a stalk are gone, cut the stalk off at about 2 to 3 inches above the soil. Be sure to leave the plant intact so it can mature and grow the corms for the next season.
Overwintering Gladiolus
Dig up your Gladioli once the foliage has faded after the first fall frost. A light frost will kill the foliage, but not the rest of plant. Be sure to dig up the Gladioli corms before a hard freeze, or the plants could be fatally damaged. In gardening terms, a “light freeze” refers to temperatures that fall just a few degrees below freezing for a few hours. A “hard freeze” or “killing freeze” is when the temperatures dip below -4°C for several days.
Use a spade and dig up the entire plant, grasping the top to pull it out of the soil. Avoid bruising or injuring corms while digging. Shake off all loose soil (do not wash them off) and discard damaged corms. Cut the stalk down to 1-2 inches above the corm. Save the small cormels (small corm growing at the base of a mature corm) separately if you so desire. These will bloom in 2 to 3 years if you replant them each spring.
Allow the corms to dry in the sun for 1 or 2 days if the weather agrees. Sift out excess soil and place corms in wooden flats or trays. Cure in a warm and airy location for about 2 weeks at a temperature of 27 to 29°C.
Don’t remove the husks on the corms. Store the corms in paper or cloth bags, pantyhose, or old onion sacks in a well ventilated location. Store the corms at 2 to 7°C in low humidity. A cool basement is quite suitable. Do not allow corms to freeze.
Replant these corms in the spring for another year of beautiful blooms. Once the Gladiolus has “pierced your heart”, you will forever have a place in your garden for them.